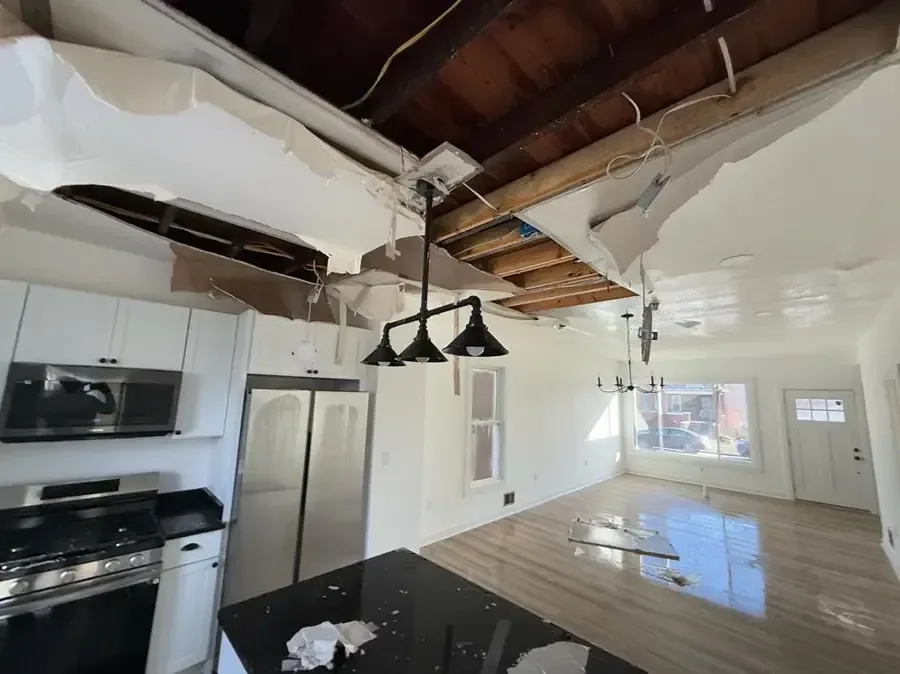
A dripping ceiling needs a clear order of work: keep the room safe, find the leak, dry the wet layers and arrange repairs. The Madison Building Department handles Chatham Borough construction permits and subcode inspections. Photographs and room notes help the owner explain the damage and planned repairs when coordinating the trades.
Key takeaways
- Keep the area beneath sagging or unstable ceiling finishes unoccupied.
- Photograph the stain with enough surrounding detail to identify its location.
- Record the source investigation separately from removal and drying decisions.
- Preserve images of exposed ceiling layers before they are covered.
- Carry the mitigation handoff into the repair and inspection conversation.
Treat the overhead condition as the first room decision
A fresh ceiling mark deserves a room assessment before furniture is shifted beneath it. Visible sagging, falling pieces, active dripping or affected light fixtures are details to report from a safe position.
The practical first question is whether the space below the affected area can remain occupied while the condition is evaluated.
An occupant should avoid pressing, puncturing or pulling at a damaged overhead finish. The assessment team needs to evaluate the material, the water path and the access required without exposing people below it.
A wider photograph from outside the affected space can show the ceiling location while preserving that separation.
The ceiling leak assessment begins with the observed overhead condition and the surfaces below. Appointment notes should describe the affected room, any visible fixture involvement and the dry route available to reach it.
That information lets the responding professional plan the inspection around the actual space.
- Keep people and pets away from the area beneath unstable finishes.
- Describe any drip near a ceiling fixture without touching it.
- Photograph the room from a safe doorway when possible.
- Identify an alternative route around the restricted space.
Connect the ceiling leak with the room above
The most useful sketch includes the affected ceiling and the accessible space above it. A bathroom, appliance area, roof space or another room may be part of the investigation depending on the building.
The person assessing the source should identify which observations support the next access decision and record the locations involved.
The crew uses the same room names on each visit and labels photographs with a doorway or other fixed feature. A note about the hallway ceiling can identify the bathroom directly above it.
That makes it easier for the plumber, drying technician and repair contractor to discuss the same wet area across different floors.
Once the plumber or roofer finds the leak, the repair report identifies the source and the work completed. The drying technician then checks the surrounding ceiling, backing and accessible cavity.
The owner can follow both tasks in the file and see which damp materials still need attention after the dripping has stopped.
Photograph the layers exposed by each opening
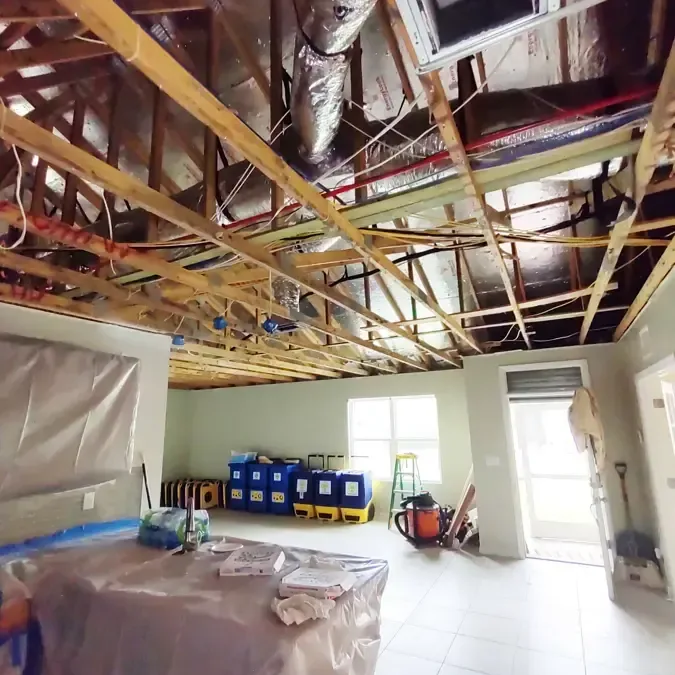
An opening can expose ceiling board, insulation and nearby framing. The crew photographs those layers before removing more material and labels wet or damaged areas by location.
The repair contractor can use the images to plan replacement materials and see how the ceiling meets the adjoining wall, fixture or other finish.
The technician explains why an opening is needed: to find a leak, remove unstable material or reach trapped moisture. The owner can discuss that purpose before authorizing the work.
Photographs of the exposed layers and a note about their condition then explain the result and the repairs left for the next trade.
Any debris handling and room protection arrangement should also be noted. Furniture that was moved, surfaces that remained covered and routes that stayed unavailable affect the repair schedule and room use.
These details are part of the practical handoff, especially when occupants continue living in unaffected portions of the home.
- Record the purpose of the opening before the view changes.
- Photograph exposed layers and their attachment points.
- Check the nearby ceiling finishes that will stay in place.
- List temporary restrictions beneath and around the work area.
Make drying findings specific enough for closure decisions
An opened ceiling may expose wet board, insulation and timber, each with different drying needs. The technician identifies the material at every test point and describes its location clearly.
A reading beside the opening and another farther along a damp edge need separate labels so the next visit can compare the same spots.
The structural drying service follows material response through repeat observations. Where equipment serves an exposed cavity, the record should explain which area it addresses and any change made after a later assessment.
That information supports a useful conversation about progress and the work remaining before closure.
Flooring and contents beneath the ceiling may also need attention if they received water. Accessible liquid can require water extraction, followed by an assessment of the contacted surfaces.
These lower room findings should stay connected to the overhead incident while retaining their own material entries and completion decisions.
Connect the repair scope to the borough process
The Madison Building Department processes construction permits and schedules subcode inspections for Chatham Borough. The borough performs zoning and engineering assessments, and property owners can check permit status through the SDL Construction Permit Portal.
These administrative records can sit beside the repair scope so the owner has the relevant project information in one place.
A useful question for the department concerns the actual proposed work: the ceiling area being repaired, the systems involved and any related construction. The owner or repair contractor can present the scope and obtain the applicable direction.
Precise descriptions of the work are more useful for that conversation than a broad statement about a past leak.
The borough also requires closure of open permits for a Certificate of Continued Occupancy. An owner organizing a longer project should therefore keep the status record current alongside inspection correspondence.
The mitigation file, repair scope and administrative status each have a clear role in showing what has been completed and what remains pending.
- Provide the department with the proposed repair description.
- Keep inspection correspondence with the relevant work scope.
- Track permit status through the borough’s identified portal.
- Retain the final mitigation findings for the repair contractor.
Preserve the details that disappear behind a repaired ceiling
Memorial Park on North Passaic Avenue and Garden Park beside Chatham Middle School help orient visitors in the borough. Inside a property, the equivalent reference points are fixed doors, room corners and ceiling fixtures.
Photographs that include those features make the record useful after the opening is closed and the stain is gone.
At the end of drying, the contractor gives the owner photographs of the original damage, the opened ceiling and the areas ready for repair. The notes identify remaining reconstruction and any room restrictions.
The owner can share that record with the repair trade when scheduling work and discussing which spaces remain usable.
If a new mark appears, the owner can photograph it and note when and where it was noticed. Earlier images help the technician compare its position, while the repair notes explain what was fixed before.
Keeping the new report separate makes it easier to investigate whether more source repair or moisture testing is needed.
Questions
Who handles construction permits for Chatham Borough?
The Madison Building Department processes and issues the borough’s construction permits and schedules subcode inspections. The borough handles its zoning and engineering assessments, so the proposed scope should be described clearly when asking about the project’s administrative steps.
What is a useful ceiling photograph?
A helpful image shows both the mark and recognizable surrounding features, such as a doorway or room corner. A close view can then record the finish condition, with both images labeled to the same location and taken without entering an unsafe area.
Why keep information about the room above?
The overhead investigation may involve a different level from the visible damage. Linking the rooms allows the source findings, plumbing work and ceiling material assessment to remain understandable when several trades take part in the project.
Which information should be available before the ceiling is closed?
The repair contractor needs photos of the opened ceiling, the source repair details and final moisture readings. The drying team also identifies any wet areas or access work still outstanding so they can be addressed before new finishes go up.